|
Setup Shipping Integration |
  
|
|
Setup Shipping Integration |
|
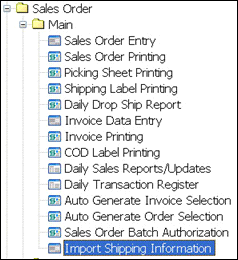
A new option has been added to the Sage 100 ERP Sales Order Main menu. The Import Shipping Information function will look for data exported from WorldShip or other shipping software and will match that data up to invoices or shipments in process based on the sales order number.
When you first select Import Shipping Information, the program will attempt to find configuration information. If it has not been configured, the following message will pop up, indicating that it does not know where to find the shipping data.
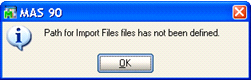
When you click OK, the Shipping Import Defaults screen will appear, allowing you to define where to find the files to import and how to handle the data in those files. You can also get to the Shipping Import Defaults screen by clicking on the Setup button on the Import Shipping Information Import panel described later.
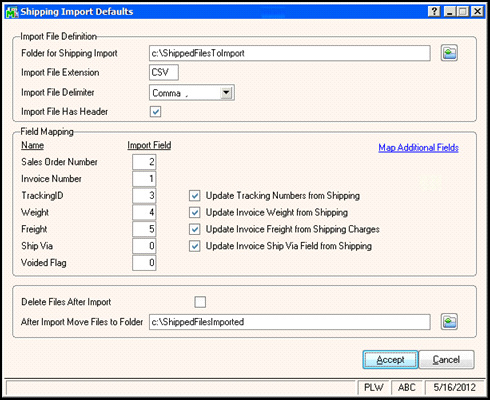
Import File Definition
Folder for Shipping Import – Enter the full path name to the folder where the shipping import file can be found. This is the file that is created by the shipping software package after every shipment. The shipping software will put the comma-delimited files here whenever a shipment is complete, or at the end of day. This shipping import function will search this folder for all the files to import.
Import File Extension – Enter the extension that will identify the files to import. The typical extension use for comma-delimited files is CSV (comma-separated values). However, you can put any extension that will properly identify the files to be imported. The shipping import function will look for files in the specified folder that have this extension.
Import File Delimiter – By default the shipping import function expects to have comma-delimited data to read, but you can tell it to look for tab-delimited or pipe (‘|’) delimited data instead.
Import File Has Header – Typically WorldShip will not put a header line in the file to be imported, but other shipping software might. If there is a header line in the file to be imported, check this box so that the import function will ignore the first line.
Field Mapping
In this section you tell the shipping import function where to find the fields it needs, and which fields to use. You must have an order number in the import file, but the other fields are optional. However, the import file must include at least one of the fields Tracking ID, Weight, or Freight. If none of these fields are in the import file, then there is no reason to import.
Sales Order Number – Enter the field number in the import file that holds the sales order number. In our example file above, the sales order is in the first field, so we enter a ‘1’ here.
Note: If you are running ASI Service Center you can also use this field to match the service order number. The import program will first try to match the sales order number, then the service order number.
Invoice Number – Enter the field number in the import file that holds the invoice number. You can use either the sales order number or the invoice number to match the shipping record, but if you provide both, the import will try to use the invoice number first.
TrackingID – Enter the field number for the tracking ID. You can leave this blank if a tracking number is not being imported. In our example file above the tracking number was in the fourth field, so we enter a ‘4’ here.
Update Tracking Numbers from Shipping – Check this box if you want the tracking numbers from the shipping software to be written to the Sage 100 ERP tracking file.
Weight – Enter the field number in the import file where the weight of the package is found. In our example, the weight was in the third field, so we enter a ‘3’ here.
Update Invoice Weight from Shipping – Check this box if you want the weight from the shipping software to be updated to the header of the sales order invoice. The total weight of the shipment will display on the totals screen.
Freight – Enter the field number in the import file where the weight of the package is found. In our example file the weight was in the second field, so we enter a ‘2’ here.
Update Invoice Freight from Shipping – Check this box if you want to calculate and set the invoice freight amount based on the freight charges from the shipping software.
Ship Via – Enter the field number in the import file where the Ship Via can be found. The ship via code in the import file must match a valid ship via code in the Sage 100 ERP system or it will be ignored.
Update Invoice Ship Via from Shipping – Check this box if you want to put the ship via code from the shipping software into the ship via code on the invoice header.
Voided Flag – Enter the field number in the import file where the voided flag can be found. This is a Y or an N, depending on if this package shipment has been voided.
Map Additional Fields
This link will pop up the window shown below that allows you to map many additional fields on the invoice header or in the tracking record fields.
NOTE – If the same field, such as FreightAmt, is in the main screen and the Additional Fields, the Additional Field mapping will happen after the main screen field mapping and will therefore override the main screen field mapping.
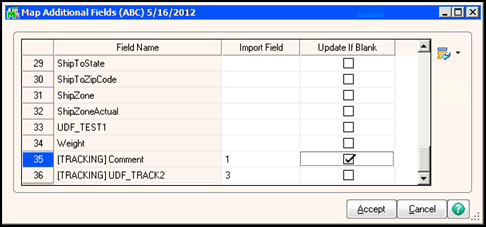
Field Name – The Field Name column gives a list of the available fields in the sales order invoice header table and in the tracking table into which you may map import information. Note that the tracking file fields have the [TRACKING] tag in front of them.
Import Field – Enter the column number of the field in the import file that you wish to place in the field name specified. If you leave it blank, nothing will be imported into that field.
Update If Blank – If you specify an Import Field to use in the file being imported from the shipping software, but that field is blank in the import file, check this box to write the blank value, anyway. If the Update If Blank box is cleared, then the target field will be left alone if nothing is in the column in the import record.
After Import
The last two fields on the screen determine what is done with the import file after the import is complete.
Delete Files After Import – Check this box if you wish to simply remove files after import.
After Import Move Files to Folder – If you do not check the Delete Files After Import box, you can specify a folder to which those files must be moved.
NOTE: The import function will read through all the files in the folder specified looking for those with the extension specified. Once it finds a file that matches, it will then read all the records in the file and try to match each record with a current shipment or invoice in Sage 100 ERP. If a record is not matched, it is copied to a file named “UNMATCHED.CSV” (or whatever extension you chose) to be matched later.