Create an Import Map
The following section will help in setting up WorldShip to import order information from Sage 100 ERP, speeding up the shipping process. This import ability is a standard part of WorldShip. The procedure and the screens shown are from version 8.0 of WorldShip.
In WorldShip, the function to extract order information from Sage 100 ERP is called Keyed Import. The first step is to create the import map. The information is read from Sage 100 ERP using Open Data Base Connectivity (ODBC), which requires that a Data Source Name (DSN) be defined. You could use the standard SOTAMAS90 DSN, which comes with Sage 100 ERP, but this can cause issues with WorldShip because it tries to verify every table that is defined in the dictionaries. To make this process more efficient, this modification has installed a new dictionary that only includes the sales order file. Follow the procedure below to define a new DSN and a new import map.
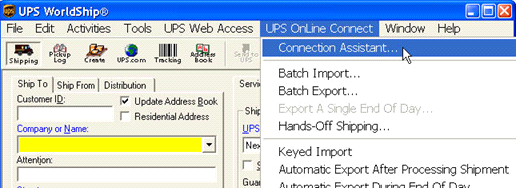
From the WorldShip screen, click on UPS OnLine Connect and select Connection Assistant.
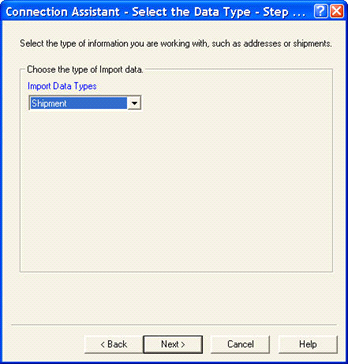
The data type that you want to import is Shipment. Select Shipment from the list and click Next.
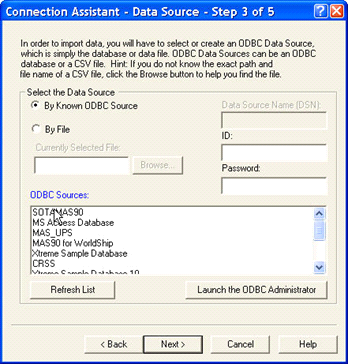
At this point, you may have to create a new data source name to use the limited dictionary provided with this modification. Check the By Known ODBC Source and click the button to “Launch the ODBC Administrator.” If you have already created a DSN to use, you can skip this section and go the Define Import Map.
Define Import Map
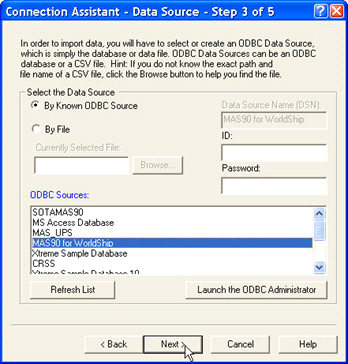
Your new DSN should now appear in the list of ODBC Sources. Highlight the new DSN and click Next.
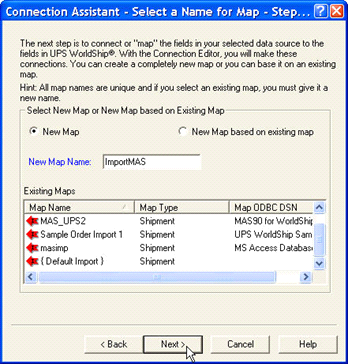
Check the box for New Map and enter your desired name in the New Map Name. You can create any name you wish. In the example above we have named our map “ImportMAS.”
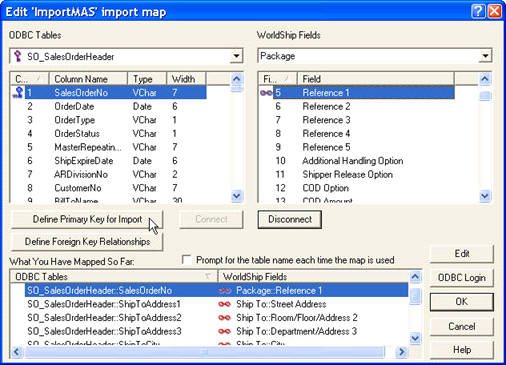
On the left side of the panel is the list of fields available from the Sage 100 ERP SO_SalesOrderHeader table. On the right are the groups and field names for WorldShip. To match fields for import, highlight a field on the right side, then find the group on the top row and the field in the list below the group and highlight that field. Then click the Connect button.
Define Primary Key for Import – In order to find the order information to pull into WorldShip, you must define the SalesOrderNo as the Primary Key. Highlight SalesOrderNo on the left side and click the Define Primary Key for Import.
You must assign the SalesOrderNo to one of the package Reference fields so that each package shipped can be tied back to the Sage 100 ERP sales order number. It really does not matter which reference field you choose. In the example above, we have connected SalesOrderNo to Reference1. The important thing is that this is the same field you must export back to Sage 100 ERP with the shipping information.
Here are some typical mappings for the import into WorldShip. Note that you can change these if you wish.
SO_SalesOrderHeader::SalesOrderNo Package::Reference 1
SO_SalesOrderHeader::ConfirmTo Ship To::Attention
SO_SalesOrderHeader::ShipToName Ship To::Company or Name
SO_SalesOrderHeader::ShipToAddress1 Ship To::Street Address
SO_SalesOrderHeader::ShipToAddress2 Ship To::Room/Floor/Address 2
SO_SalesOrderHeader::ShipToAddress3 Ship To::Department/Address 3
SO_SalesOrderHeader::ShipToCity Ship To::City
SO_SalesOrderHeader::ShipToState Ship To::State/Prov
SO_SalesOrderHeader::ShipToZipCode Ship To::Postal/ZIP Code
SO_SalesOrderHeader::ShipToCountryCode Ship To::Country
SO_SalesOrderHeader::ShipVia Shipment Information::Service Type
NOTE: In the above example, Ship Via is connected to WorldShip Shipment Information: Service Type. It is probably that the Sage 100 ERP Ship Via codes do not exactly match the Service Type fields used by UPS. You can take advantage of WorldShip’s translation feature to make them match. When the two fields are highlighted, click the Edit button. Then click the translate button and select Service from the list. This will bring up a list of the Service Types for WorldShip. You can then select each service type in the list and change the External Field to match your Sage 100 ERP Ship Via codes.
Once you have linked all the fields you wish to import from Sage 100 ERP, click OK to save the new import map.
Keyed Import
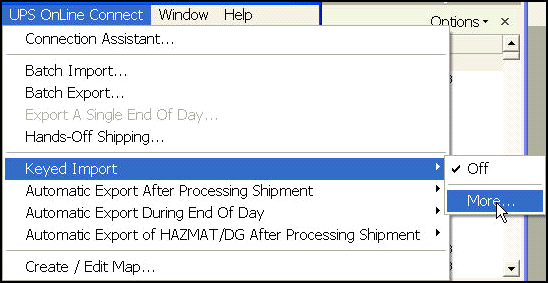
The final step is to tell WorldShip that you wish to start Keyed Import, and to specify which import map to use. Click on UPS OnLine Connect then Keyed Import. You may have to click the More option to display all the import maps available. Select the map that you just created.
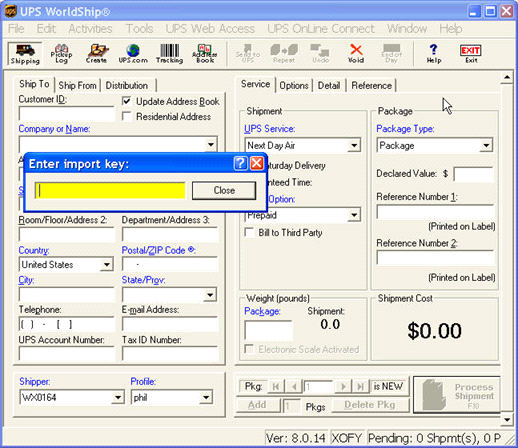
If the map is properly defined, a new window will appear for you to enter the Import Key. This is the seven character sales order number, and it must have the leading zeroes. Once you enter a valid order number, the fields you mapped in the section above will automatically copy over to the shipment.
NOTE: It is important that the Sales Order number from Sage 100 ERP be copied to a reference field for every package. Use the Tools / Profile option to define a profile for each user of WorldShip. On the Reference tab, click the box to tell it to Use on All Packages for the reference field that you have chosen for the order number.
Exporting Worldship Shipping Information
The final configuration to make the transfer of shipping information back to Sage 100 ERP is to tell WorldShip how to export back to Sage 100 ERP. This is a standard feature of WorldShip and is not part of this modification, but the following screens will help in this process.
From the UPS OnLine Connect menu select Create/Edit Map.
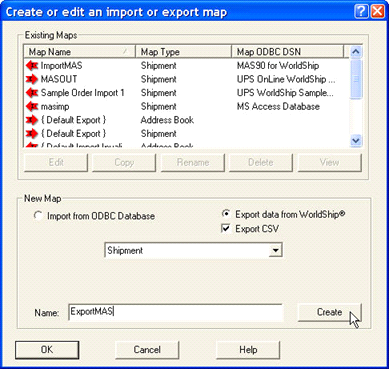
In the New Map section, check the Export data from WorldShip and the Export CSV option. In the drop-down list, select Shipment and enter the name that you wish to give to your new Export Map. Click OK to proceed to the mapping screen.
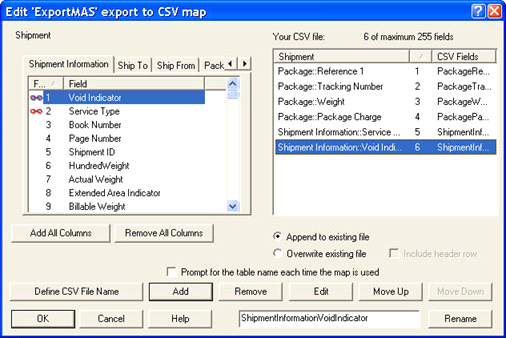
On this screen, choose the tab for the group and the field to add to the comma-delimited file you will create. On the right side of the picture above you will see an example of the standard fields that can be imported into Sage 100 ERP with this modification.
It is important that you click the box next to Append to Existing File so that you can process many shipments through WorldShip without having to run the Sage 100 ERP Import Shipping Information every time.
You will also want to click on the Define CSV File name in order to tell WorldShip where to put the information that it exports. The folder you enter here is the same folder that you specified as the import folder in the Import Shipping Information defaults.
If you choose to export the Service Type field, you may again want to Edit the field and select Translate to convert the UPS Service Type names back to your Sage 100 ERP Ship Via names.
When you have completed the mapping, click OK to save your new export map.
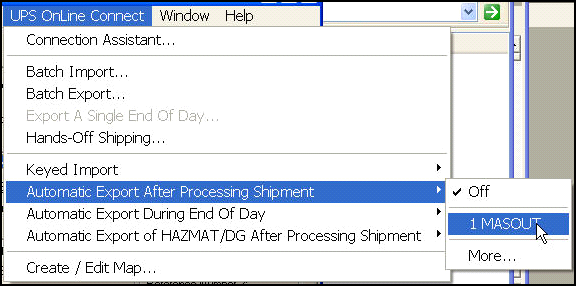
Finally, from the UPS OnLine Connect menu, select Automatic Export After Processing Shipment, then select the new export map. This will cause WorldShip to add to the comma-delimited file every time a shipment is processed. That information will then be available for import into Sage 100 ERP on a real-time basis.