

How to Set Up Paperless Office to Save/Print Year-End Reports
Here are step by step instructions for setting up Paperless Office to save your period and year end reports in PDF format so they’re searchable and easy to retrieve later.
Set Up Paperless Office
- Open Paperless Office, Setup, Paperless Office Options.
- In the ‘Enable Electronic Delivery and PDF Storage’ section, select all options.
- In the ‘Load Date on Initial Viewer Access’ section, select all options.
- In the ‘Keep Only the Last Copy’ section, select Period End Reports.
- Click Accept.
Set Up Period End Report Maintenance
The following steps are applicable for all modules.
- Open Paperless Office and navigate to Setup > Period End Report Maintenance.
- Select applicable Company Code and module from look ups (Note: you can select any module or ALL modules).
- In the PDF Directory, enter the full path of an existing folder to use for storing the period-end report in PDF format, or click ‘Browse’ to choose a folder.
- Select whether to password-protect PDF documents which requires entry of a password to view the PDF after it’s created (Prompt = displays a message requiring you to define a password each time the PDF document is created, Yes = always protect the PDF document with the password entered in the Password field, and No = create the PDF document without password protection).
- If you chose the Yes option, type the password that will be required to view the PDF documents created.
- Confirm and re-type the password entered.
- Click Accept.
Paperless Office Report Maintenance
 If you have the appropriate security access, you can also add public favorites. Public favorites are available to all users who can access them based on their security setup.
- Open Paperless Office and navigate to Setup > Period End Report Maintenance.
- Select applicable Company Code and module.
- In the Document field, select the report to define PDF settings for. This field displays all reports for the selected company and module. Select All Documents to define PDF settings for all reports in the selected company and module.
From here, the remaining steps are identical to steps 3 – 7 in the Period End Report Maintenance section above.
Refer to this support article for full details including setup instructions for payroll registers and reports.
Creating a Copy Company for Archive/Backup
At year end, it’s useful to create an archive company using the Copy Company feature. This provides a readily accessible copy (and backup) of the current year’s data even after you perform year end processing in your live company.
To make a copy company, go to:
Library Master > Main Menu > Company Maintenance
- Create a new company code and company name (description) that’s easy to identify and distinguish from the live/active company that you’re copying.
- Click the Copy button and enter the Company Code of your current year live (or “Source”) company.
- Select the modules from the source company you want copied over to your archive company. For a complete archive/backup, you’ll want to copy all modules. Click Proceed. Once the process is finished, click Accept.
Note: For good measure, you might run a trial balance in each module and do a quick spot check to make sure all the data that came over is balanced and accurate.
Video: How to Back Up Data
Four Things to Note Before Closing the Books
- Back Up Your Data
Executing a complete backup of your database is one of the most important things you can do before starting any closing process. You should also test the backup to ensure it was performed successfully and the data is readable.
If you make a mistake, the only way to “reverse” year-end processing is to restore data from a backup.
- Follow the Module Closing Order
A year end process in one module often writes data to another related module. Therefore, closing modules in the proper sequence is extremely important in order to avoid unexpected results or damage to your data.
- Follow the Module Closing Checklists
Step-by-step checklists are available for most modules. These checklists provide guidance on the sequence of detailed tasks and procedures that should be performed within each module.
Detailed checklists for each module can be accessed right from within the Sage 100 Help system.
- Preview the Process
A video is posted on the Sage Customer Support and Training channel on YouTube that walks you through an overview of period and year-end processes. It provides a nice refresher before starting your live closing process.
Module Closing: Keeping Things in Order
A year end process in one module often writes data to another module. Therefore, the sequence in which you close your Sage 100 modules is important in order to avoid the risk of damaging your data.
Important: Remember to back up your data before starting module closing procedures.
1. B/M – Bill of Materials*
2. W/O – Work Order*
3. P/M – Production Management
4. B/C – Bar Code
5. P/O – Purchase Order
6. S/O – Sales Order
7. I/M – Inventory Management
8. M/P – Material Requirements Planning (MRP)*
9. P/R – Payroll (Quarter-end processing)
10. A/R – Accounts Receivable
11. A/P – Accounts Payable
12. J/C – Job Cost
13. B/R – Bank Reconciliation
14. G/L – General Ledger
*Note: While there is no formal closing procedure in the Bill of Materials, Work Order, or MRP modules, all transactions in those modules should be posted before starting any closing procedures in the modules that follow them (i.e., Post transactions in Work Order before closing Purchase Order, Sales Order, and Inventory).
Remember, this is just a general guideline. If you own modules that aren’t listed above or you run any third-party add-on products, please contact us to discuss specific closing procedures for your company.
Four Tips for a Successful Year End
Here are just a few tips to keep in mind as you begin year end processing in Sage 100.
- General Ledger Closing – While it’s a good idea to close modules in a timely fashion, the General Ledger can remain open for as long as you need while awaiting final processing (or audit adjustments) in other modules. A GL that’s still open for 2023 will NOT prevent you from entering transactions for the new year.
- Payroll Planning – Even if your company is on a fiscal year, you may need to close out payroll at the end of the calendar year (particularly if you’re running an older version of Sage 100 Payroll).
NOTE: This does NOT apply to the newer Payroll 2.0 module which allows two calendar years to be open, so you don’t have to run year-end tax reports and W-2’s before processing payroll for 2024 (as was required with the old/legacy payroll module).
Full Details: Year End Processing in Payroll 2.x and Higher
- Check Your Version Number – Closing procedures can vary depending on which version of Sage 100 you’re running. Here are steps to identify both your version number and service pack:
Select Help > About Sage 100
- Master Console – Once you’re ready to close, you need to make sure all users are out of the system. That’s where the Master Console comes in handy. This utility provides a snapshot of all users currently logged into Sage 100, the workstation being used, what programs/tasks they’re using, and more. You can also broadcast a message to all users or even shut them down remotely.
To launch the Master Console:
Select File > Master Console
Sage 100Supported Versions Update
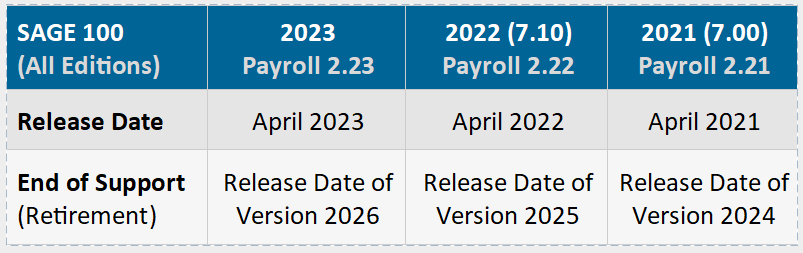
Important Notes: Retired versions have limited to no phone support which currently includes Sage 100 2020 and earlier. Customers using Sage 100 2017 with payroll will need to upgrade to a supported version. Sage 100 Version 2017 & earlier will not support additional fields that are necessary to accurately calculate federal withholding taxes as a result of changes implemented in 2020.
Get Complete Support Details Here …
Sage 100 Year End Center
Sage has created a Year End Center that provides valuable resources to guide you through a smooth year end closing process in Sage 100 including:
- Year End Tips and Checklists
- Video Tutorials and How-to Articles
- Live Chat with Tech Support
- Tax Forms, Payroll, and Report Guidance
Take advantage of this free and valuable resource!
Be sure to Contact Us with any questions or to request help with year-end closing.